I ordered a plethora of Dinosaur Toys from Amazon, and had to come up with some grown up uses for them. This jewelry organizer is easy to make, unique, and adorable! It can hold tons of bracelets and necklaces too! It looks so fun hanging up on my wall. You could also use it for keys.
Supplies:
Wooden Plaque
X-Acto Blade
Hot Glue Gun
Dinos
Optional: Paint ( I didn't paint mine...yet)
First, you need to cut your dinos in half with your X-Acto. Some people use just the dino heads, some just their tails. I used both. I cut them right above their hip bones.
I lined the six pieces up on the plaque to get a feel for where I would like to place them. Then I just added hot glue and pressed the body parts to the wood. I held each for a few seconds, then added some hot glue around the edges while they were against the wood for extra hold.
There you have it. Ready to hang on the wall and hold your jewelry, keys and whatnot. There are a ton of variations you can do depending on the shape of your plaque and the dino parts you use. Some people even paint over everything to give it a monochromatic look...but I'm a colorful gal so I left them natural. I'm seriously contemplating painting, or even gluing plants to the plaque.
Bonus: You can use a Brachiosaurus for a ring holder!
Thanks for checking out my tutorial. If you would like to make Dino planters, you can see how here.
~Crystal Vicious
These dinosaur planters are super adorable and really easy to make! All you need is an X-Acto blade, hollow toy dinos, soil, and tiny plants. I'm rooting spider plant babies in mine right now...until I am able to steal some succulents from my guy friend. Then I will have an entire herd of spiky little dinosaurs!
If you already have plants selected for these guys, you can use a pen to mark out a square/rectangle on the back of your dinosaur. I didn't with the Brontosaurus because I knew I wanted his entire back removed to fill it with spidey babies. Use your X-Acto to remove the panel from the dinosaur. I told you, it's super easy.
Now, just fill up the dino with soil (or water in my case) and place the plants inside. These are absolutely adorable. Using these for succulents or air plants woud make a great gift for any dinosaur lover.
Bonus: This Parasaurolophus didn't like standing up on his own, but he fit perfectly in my Marimo aquarium. These Dinos are a fun addition to terrariums and aquariums too!
~Crystal Vicious

I have been a dinosaur lover my whole life. My mother tells stories about when I was a toddler and would run to the dinosaur books at the library. I could pronounce the names of dinosaurs she had never even heard of. I was hooked. Now, thirty years later, I am still obsessed.
I saw this set of toy dinosaurs on Amazon. They were a great value and looked really neat. As a grown woman I knew having a set of twelve toy dinosaurs might seem a little silly, so I tried to be creative with them. I decided to make planters and a jewelry holder. I will put links to tutorials at the end of this blog.
This set from Kids Imaginative comes with twelve different species of dinosaurs. Their quality was way better than I had expected. I thought they would be similar to the hard plastic ones from a dollar store, but they are actually pretty soft and the details are so good!
While I came up with ideas for some of these guys...the Tyrannosaurs and Stegosaurus will forever hang out on my shelf. "Curse your sudden but inevitable betrayal!" I you ever want some Dino toys for your kiddos or have a Dino DIY project you want to do, I would definitely recommend this set!
Dinosaur Planter Tutorial
Dino Jewelry Organizer Tutorial
I received these at a discount. My opinion is 100% honest, unbiased and my own.
~Crystal Vicious
Happy Mother's Day to all the moms out there, especially my Mum!
I made my Mum a neat card this year out of a ton of mixed materials I had lying around my studio. I wanted to share how I made it in case anyone is feeling crafty and wanted a bit of a tutorial/idea for a snazzy little card.
I used a ton of stuff for this, but this list can easily be modified.
Materials:
9x12" Watercolor Paper (cut in half)
Book pages
Watercolor Pencils
Watercolor Paint
Scrapbook Embellishments
Beads
Sewing Pins
Stencil and Glue
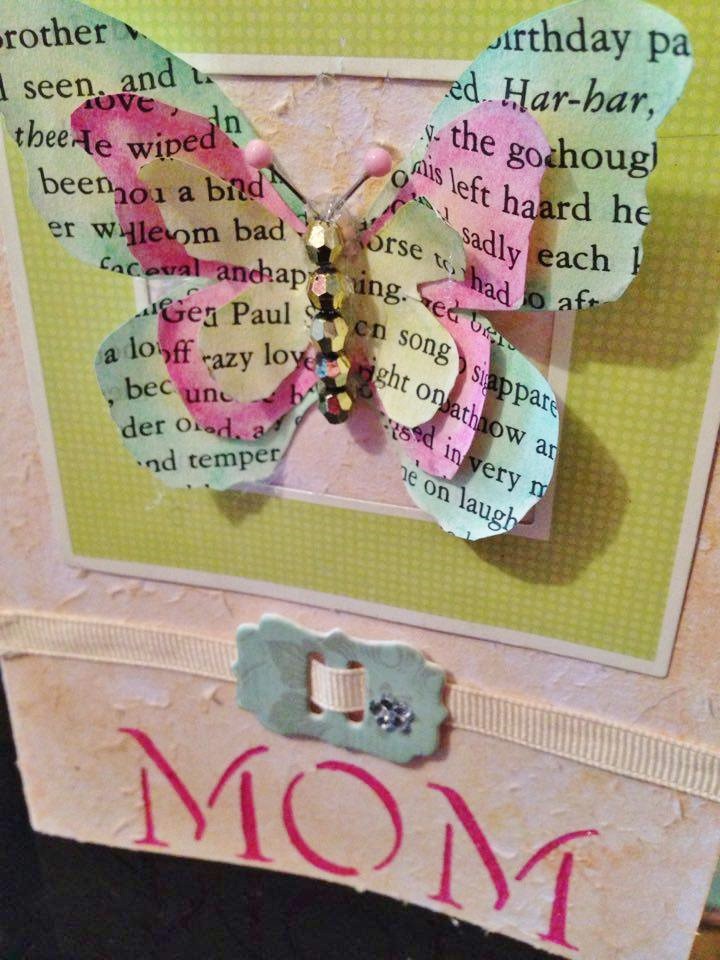
First, I traced 3 different sized butterfly shapes onto book pages. This "Paul Simon" line just had to make it's way into the project because serendipity and all. I gave the watercolor paper an aged look by using yellow and brown watercolors and then rubbing it with a paper towel to rough up the paper.

I used various watercolor pencils to color the three butterflies. My Mum likes pink and green, so that is the color scheme I chose. I then hot glued (I could not find any of my glue sticks) the square scrapbook cutout onto the top half of the card to use as a frame for the butterfly, followed by a ribbon with a cute little embellishment underneath.
Then, I glued the 3 butterfly cutouts one by one inside the little green frame cutout. I bent the wings up to give them a cool 3D effect. I used my favorite pink glitter gel pens to write out MOM with a stencil, because my handwriting is crap.
After, I hot glued five gold beads (from a broken bracelet) down the butterflies body and I used bent sewing pins as antennae. I'm all about reusing and recycling here. Now these items have a beautiful new home that isn't a landfill.
Since my writing is awful, I found a cute quote on a piece of vellum that was with my scrapbook supplies. I glued that down on the inside of the card...but still had to write in there a little bit.
I even had a green envelope that was just the right size for this card. Be sure to slide it in there easily. I really love how this card came out. I spent a lot of time and effort making it, so I know my Mum will cherish it more than any store bought cards. She is a sucker for sentimental stuff.
Happy Mother's Day Mum! You are the most amazing mom that could ever be and I love you more than words and art could ever express. <3
Love Always,
Crystal